Tuesday, January 22, 2013

Easiest skirt ever

I made a skirt for Brooke.  If I had ten uninterrupted minutes to sew it, I'd tell you that's how long it took.  Since I have four children, I don't have ten uninterrupted minutes, so it took more like thirty. 
I used this ruffle fabric, and knit elastic.  In a perfect world I would have used purple thread, then my wonky lines wouldn't be so noticeable.  But it's not a perfect world, it's a world where all my thread is in storage and I happened to have this yellow from a sewing project I did for church.  Brooke thought it was cool though, she put it on and said, "I love it!! It's like a Santa belt!"  She's the eternal optimist.  Obviously that seam goes in the back, but whatev. 
And here she is with her best pose.  Future model for sure.  

PS. I have no idea why she felt the need to tuck her shirt in, she's got a style all her own. :)

Saturday, January 5, 2013

Ways I Wanna Be Better in 2013

It's a new year and I've been thinking a lot about how I want to be better.  These aren't resolutions, more just areas that I want to look back on in December 2013 and be able to say I've grown.
The time is now.

-Be a better reader of the Word.  Memorize more, study more, meditate more.  True growth will only come if I'm depending more on the Lord to help me.  I want to depend on him and the truths he gives me, not on my own abilities.

-Be a better wife, best friend, communicator, servant, lover, help-mate.  We celebrate 11 years in June and I pray this year will be our best. But with four kids it takes work to make it thrive. 

-Be a better mom.  I want to be more intentional and present in my kids lives.  I want to have more one on one time with them.  I want them to never doubt how much I love them, even in the midst of working through discipline issues.

-Be a better friend.  Take time to pray more for my friends.  Take time to send special notes and gifts to friends to show them how much I cherish their friendship.

-Be better to my body.  I'm still nursing so it's not like it would be too healthy for me to try and drop 20 lbs right now.  But I just want to be more conscious of the choices I'm making and I want to move towards being more active.

-Be a better seamstress.  I've got lots of projects that I'd like to complete for my kiddos and even want to try my hand at making some things for myself.  Most of all I want to learn how to use my serger.

-Be a better photographer.  I've had my camera for almost three years now and although I can get good shots of my kids and family from time to time, I want to get GREAT shots.  I need to read up on rule of thirds, composition, etc.  And I want to learn more about photoshop.

Here's to a year of growth!!

Tuesday, January 1, 2013

Favorite Valentine's Fonts {and pink chalkboard}

Chalkboard art is EVERYWHERE!!  I thought it'd be fun to have a pink chalkboard background to play around with and maybe use it to make some Valentine's cards.  I used the free background found here, dumped it into photoshop added a layer, changed some opacity and ta-da!
PINK CHALKBOARD
Download yours for free here 

And if you need some inspiration in the font department for your Valentine's cards, here are some that I am loving

What are some of your favorite Valentine's fonts?
Got any cute ideas for cards? 

Blog PSA: I realize this is a "sewing" blog and there hasn't been much of that going on as of late. My life has been consumed with things like: birthing a baby in June, putting our house on the market, potty training the toddler, selling the house, moving from the house, looking for a house (still haven't found one yet) and other things a mom of four does on a daily basis.  I do have high hopes of sewing more this year, and time permitting posting finished projects.  I was GIVEN a serger and I'd really like to learn how to use it.  Sewing is one area of my life that I'd really like to grow in this year.  So stick around!

Linking to: 

Wednesday, November 21, 2012

Grandma Jane's Butterhorns {a recipe}


My Grandma Jane could cook.  One of my favorite things she used to cook was these delicious butterhorns.  We lost her last month, she's with our Savior now.  I will always love making these because they remind me of her.  
Hope you love them as much as I do. 

Grandma Jane's Butterhorns
  • 1/2 C. butter-flavored Crisco
  • 1 C. scolded milk
  • 1/2 C. sugar
  • 3 eggs
  • 1 pkg yeast (dissolved in 1/4-1/2 C water)
  • 1 tsp salt
  • 4 1/2 C. flour
Heat shortening, milk, sugar till melted.  Do not boil.  Cool till just warm to the touch, add yeast.  Add beaten eggs.  Add salt, then add one cup flour at a time.  Knead and work in a little more flour till dough is sticky not heavy.  Cover and let rise to the top of bowl, about hour and a half, sometimes longer, depends on humidity.

Flour counter and divide dough into three or four equal parts, roll out in circle. 
Butter circle and cut in eight or ten pie shaped pieces.  Roll these pieces from large to small end.  Place on cookie sheet, cover and let rise again about an hour. 
Bake in 375 degree oven for 15 minutes or until golden brown.  Spread tops with butter when warm out of the oven. 
A tip: 
-my mom used to always let these rise in a warm, steamy bathroom.  This year I tried putting them in a warm oven, seemed to work fine.  I turned my oven on to lowest setting, let heat up, then turned oven off and place covered dough in oven to rise.  I covered my dough bowl with a moist tea towel. 

PS. Is the term "let rise" or "let raise" correct...I'm no English major.  Either way I figure you know what I mean :)
PSS. You know there is a little green "Print Friendly" button at the bottom of this post under the LinkWithin links. Click on that and it takes you to this nifty page where easily print this recipe, even remove the pics if you want for cleaner printing. Just an FYI. 

Wednesday, November 14, 2012

Comparison: the poison of parenting


Today a friend on facebook quoted her daughter (younger than Lincoln) using real words, full sentences in fact.  And I let the poison that is Comparison creep in.  All I want in the world is for Lincoln to start speaking.  I long to hear his sweet voice say "love you momma."

We are all guilty of letting this poison in.  Me, sometimes so much so that it consumes me.
Why is my kid in the 10 pt club when others his age are in the 25 pt club?  I wish my baby was sleeping through the night, so and so's is.  Why isn't my toddler saying words when others younger than him talk in sentences? Why are my girl's letters backwards, her friend can sound out and spell words?
And on, and on, and on.  Well I've decided I'm stopping.
God blessed me with my kids, they are "fearfully and wonderfully made."  And I need to cherish them as such, not compare what they are and aren't doing to someone else's kid (or worse still, comparing my kids to each other).  This poison of comparison has two side affects, pride and shame.  I either become prideful because my kid is doing so well compared to others or shameful because my kid isn't measuring up. I want to guard against both in my life, so I'm going to stop comparing.  Yes, I'll be proud of my kids and the little victories they have, but I'll also stop feeling shamed that my kids haven't succeeded where others have.

God has us all on an individual timeline, and this poison made me forget that.
No more. 

Wednesday, August 1, 2012

Chicken Taquitas {a recipe}

These are SO yummy.  But I might make a small suggestion to not make these when you're husband is gone and you're single-mommin' it with a nursling, a toddler and two rowdy kids.  You might almost lose your sanity.  Not that I know from experience. *ahem*
I mentioned it before when I shared my everyday spaghetti sauce recipe.  We have these for dinner lots, but they'd be great as little appetizers if you used six-inch tortillas.  Reheat in the oven any leftovers to keep tortilla nice and crispy. 

CHICKEN TAQUITAS
1 lb. boneless, skinless chicken breasts
1 C. water
1/2 C. minced green onions
1 tsp. minced garlic
3-4 C. Crisco oil
1 C. finely chopped tomatoes 
6 T. chicken broth
2 T. flour
1/2 tsp. salt
1/2 tsp. cumin
1/2 tsp. oregano
1/2 tsp. chili powder
flour tortillas

Simmer chicken in water in 10-inch skillet, covered for 20-25 minutes.  Remove from water and cool.  Shred with fork.  Saute onion and garlic in 1 tablespoon oil for 1-2 minutes.  Stir in chicken, tomato, broth, flour and spices; simmer 3-5 minutes. 
In a heavy 10-inch skillet, heat about 1-inch of oil.  Dip tortillas quickly into oil to soften; drain on paper towels.  (Confession sometimes I skip this step and just roll tortillas up as normal, it works just fine that way.)  Spoon about 2 tablespoons of mixture down center of each tortilla.  Roll up tortillas tightly.  Secure with wooden toothpicks.  Fry at 375 degrees until golden brown.  Drain on paper towels.  Keep tortillas warm in 350 degree oven.  Remove toothpicks; serve with guacamole or sour cream.  Yield about eight 10" tortillas or a dozen 6" tortillas.

Thursday, July 12, 2012

Sawyer Jon

Never would have thought I'd have a baby with blue eyes.  Denim-blue eyes.  But it happened.  Not sure they'll stay, but at almost four and a half weeks, I think it's likely.  He's pretty handsome, of course I'm a little partial to someone I grew inside me.  

Thursday, July 5, 2012

Enjoying Life {I Heart Faces}

I haven't blogged since I don't know when.  I was busy this spring gestating a baby and then three and a half weeks ago birthing said baby.  Thought I'd jump back into blogging with a link up to I Heart Faces July photo challenge. 
I love this picture of sis holding baby Sawyer for the first time.  She prayed and prayed for a sister, but God had other plans for our family.  And even though she cried when dad told her we had a boy, when she got to the hospital to meet brother she was so sweet on him.

Photo Challenge Submission

Monday, March 5, 2012

How to clean car leather

This is probably an odd post for a my blog, but that's okay.  You'll thank me later.  
We recently bought a new-to-us van.  Seeing as I'm now 26 weeks pregnant and our current car already had three car seats sandwiched in the back seat, we were in need of a van.  We found an '05 Odyssey that was great and what we could afford.  The only thing I wasn't in love with was that the seats were pretty dirty.  But we bought it cause it was very well maintained mechanically and the people we got it from were super nice.
So what to do about the dirty leather.  I started by doing some research.  Aside from specifically made car-care products, the suggestion that popped up over and over again on car/van forums was Woolite.  Plain old Woolite.  Huh?  Figured it was worth a try.  And it worked.  Pretty darn well, I'd say.
Here's what I used:  Woolite, I picked up a bottle at Target for $8.  Mix that with some water at a 1-10 ratio, ie. 1 C. Woolite to 10 C. water.   Old toothbrush, old baby brush, and some microfiber towels.
Vacuum out as much of the gunk in the seams as you can.  Spray some Woolite mix on the seats let it sit for a few minutes.  Then get to scrubbing with the baby brush or the toothbrush depending on what area you're cleaning.  Wipe off with a dry microfiber towel.  If more work needs to be down, repeat the process.  After I was finished I wiped the whole seat down with a wet microfiber towel.
Here are the results!! All these pictures are straight out of camera (no editing done).
Pretty good, right?!!  To do this bucket seat, it probably took between 30-45 minutes.  But they look a million times better.  Obviously not showroom floor quality, I mean the van is 7 years old, but compared to what they did look like, I am VERY pleased.
So go get yourself some Woolite and get to cleaning.

Linking to:
Make it Monday
Tip Me Tuesday
Show and Tell
Weekend Wrap up


For more information about cleaning your car interior check out Homeviable. They've got a helpful post about detailing.

Oh, and just because this is 2012 and people are ridiculous, I assume no responsibility if you use this method and it damages your leather for some reason.  Use your brain.  

Wednesday, February 29, 2012

DIY Glitter Polish {st. patrick's day nails}

My girl loves glitter polish, and I have kinda been loving it lately too.  Did you know that you can make your own on the cheap?
I was googling glitter polish the other day (who knows why) and came across tons and tons of post about making your own.  HELLO, endless possibilities!!
All you need is some clear polish (a sheer color polish would probably look awesome too), and some glitter.  You want your polish to have a little bit of head space at the top, ie. not be a new unused bottle.  I should have poured a bit out of mine to make more room.  
My polish costs a whole .99 cents at ULTA and I had this micro glitter in my stash.  
Pour some glitter into your polish using a paper funnel.  Sidebar, a lot of posts that came up on google actually showed you how to make a funnel w/ paper.  If you're a functioning adult capable of getting on the internet I'll assume you can figure out how to make a funnel.
Ok, back to glitter, pour some in.  Give it a good shake.  
Voila!
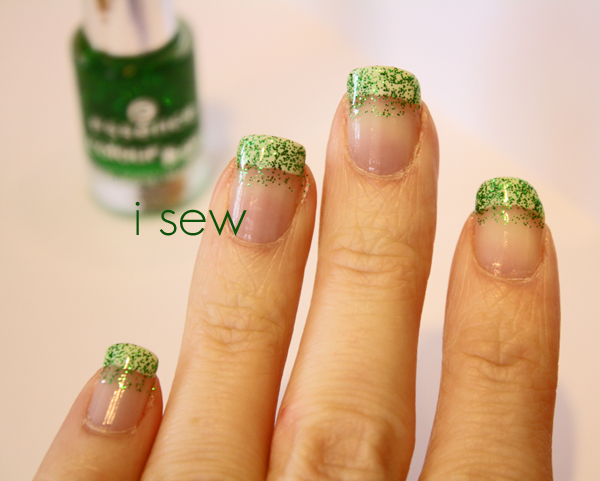
 Now paint your nails with your cheap glitter polish.  For mine I did white tips then two coats of green glitter.  SUPER FUN for St. Patty's Day. 
Please excuse my overly dry cuticles that need some TLC.  
I think it looks pretty darn awesome!  I'm gonna do Brooke's later today.  And I can't wait to get some more springy colors and make her a whole set.  Possible Easter gift?  

Word to the wise:  The glitter will settle after awhile, but just give it some good shakes to redistribute it.  Real glitter polish has a special something that helps keep the glitter suspended.   Also depending on the glitter you use, your clear polish make take on some of the glitter color.  After a bit mine turned slightly green, but it didn't affect application at all.  If you used cosmetic grade glitter this probably wouldn't happen.  But since this is a cheap project using stuff I had on hand, I wasn't to concerned about either of these issues. 

PS. Is it me or do I look like I have a freakishly short pinky finger?

Monday, February 20, 2012

Gray w/ Silver Sponged Tips {nails}


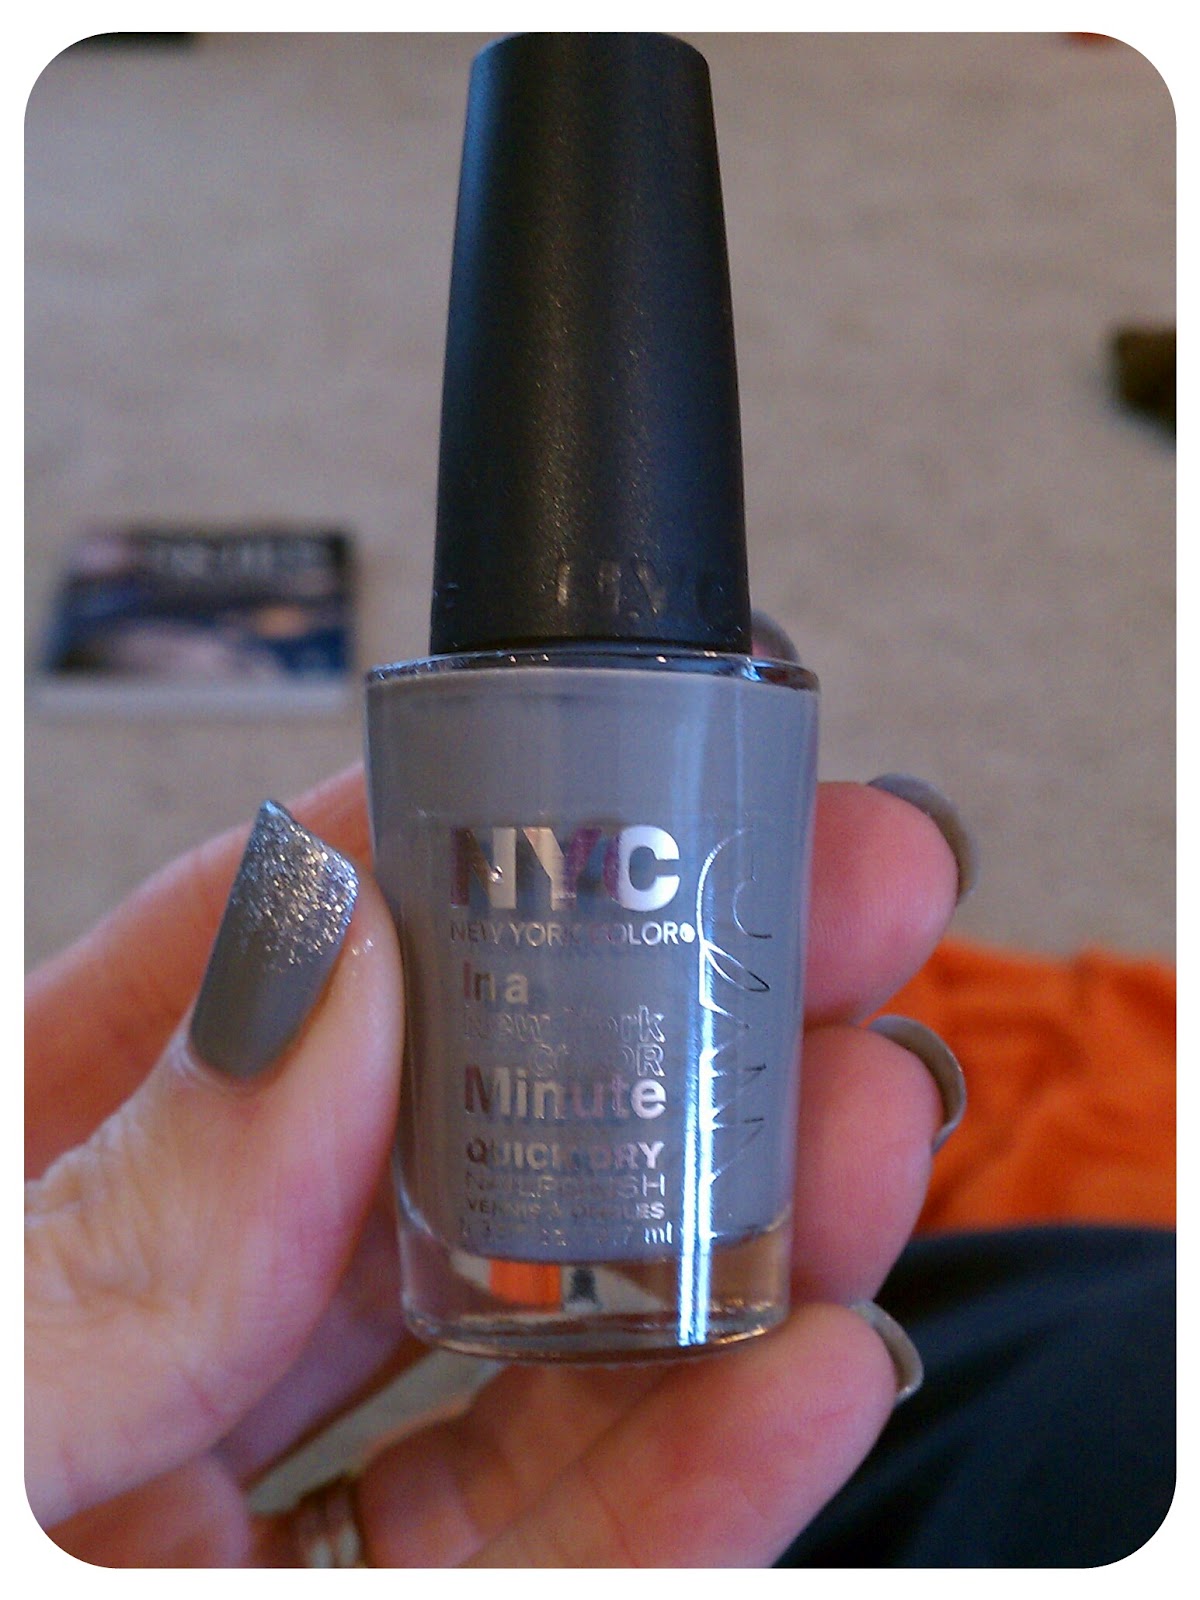
Gray.  Who knew?  But I kinda love it!  The gray is super cheap NYC Sidewalkers. 
It is actually really great polish, surprisingly.  Goes on smooth, and after three days showed no major signs of wear.  Even without a topcoat.  But after those three I decided to add some flair to my tips.
Gradient silver tips.  Fun, right?!

(This post is mostly an effort to see how well posting from my phones goes, checking formatting and stuff.)

ETA: Blogger app=epic fail.  At least for Android.  Pictures were throw in at bottom of post and not in the order I uploaded them.  Pictures were grainy and didn't look right at all and wouldn't enlarge.  Ended up emailing them to myself and reposting from blogger dashboard online.  If you want to post from the app just a plain text post, go for it.  That worked.  But if you plan on adding pictures (which is what makes reading post interesting anyways), I'd steer clear.  

Thursday, February 2, 2012

New Socks


It's actually Thursday.  And even though she constantly gets her feet stuck while sitting like this way, it's still her preferred choice. 

ETA: My friend Sheyenne wondered about this pic, so here is the sooc, and final edit along with some details. 
 ISO800 * 55mm * f/5.6 * 1/15 sec shutter speed.  
Here's what I did with it in photoshop elements.  I ran Urban Grit action from Coffee Shop Blog. I painted just on the socks to apply the affect.  Then I ran Purely for the Web action from Pure.  That's it.  
I obviously am by NO means a photographer or expert photoshopper, BUT I'm learning, and it's fun to learn.  As a result of me learning, you'll probably be seeing lots more short photo posts like this one.

Monday, January 30, 2012

LEGO Obsession Continues {the girly edition}

After Christmas I had got on the LEGO website, don't really know why actually, but I came across these.  A new line of LEGOS, just for my girl.  How cute!!  We were already getting her a big girl bike, but knew what we'd be telling grandparents to get her.  It's no secret that in our house LEGOS are a bit of an obsession with Mason.  Now Brooke would be able to join in the building fun.  Unlike Mason though, I suspect her sets will stay put together.  Granted, Mason keeps several of his intact, but he goes on building sprees where everything gets taken apart then put back together in some new creation.  Brooke on the other hand has been playing with her sets for a over a week now just as they are.
I just CANNOT get over the cuteness of these!!
Olivia's Tree House.  I spy a Star Wars guy, can you find him? 
Heartland Dog Show.  She thought more doggies were needed so 101 dalmatians came to play too. 
Seriously?! The cuteness!! Dog washing station that goes with the dog show.  Interchangeable bows, little LEGO water pieces, white picket fence.  Cute.  Cute.  Cute. 
City Park Cafe.  I think this is my favorite that Brooke has so far.  
Don't you agree? 
(L to R) Ice cream maker, pie display case, cash register with cupcakes ready for purchase.  Those cupcakes are actually upside down, the brown cupcake is supposed to fit in the yellow wrapper but didn't fit right (my only negative for this set), so we put the on the bottom.  At the booth two soda fountain drinks and a juice box.
Want to eat your burger out on the patio?  Go for it!!
Need some ketchup or mustard?  How 'bout salt and pepper?  They've got you covered.
BEYOND CUTE!!
Butterfly Beauty Shop.  A close second for favorite is the beauty shop.
If the Friend's need a new look, just swap out the hair.
Lipstick bar, oh my!
Ready to pay?  Check out at the cash register.  Brooke informed me later we forgot to put the sticker on the screen.  She fixed that problem.  Way to pay attention to detail!
The Friends.
She has seven, one was playing in her room when they took this group shot.

Brooke has already started asking for the Heartlake Vet.  It comes with a hedgehog named Oscar, and really what's cuter than a hedgehog?

So what do you think?  Aren't these so fun for a little girl?!!
The LEGO invasion continues. 

Monday, January 2, 2012

Very Last Minute Teacher Gift

The morning of Mason's last day of school I realized that his teacher should probably have a gift.  Whoops!! I blame my pregnancy brain.  
I had seen cute mug rugs over on Smashed Peas and Carrots here and here.  Her tutorial on how to sew bias tape was VERY helpful.  I have done a few bias tape projects before, but this one turned out the best by far.  I even made the bias tape cause I had no time to drive to town and get it.  A shower had to be taken before I went to Mason's party at school.
I adjusted the dimensions down just a bit, I think mine ended up being 9x5ish.  I was really pleased with how it turned out.  Luckily his teacher loved it too.  Should probably make a stash of these to have on hand for last minute gifts.  I know I want one for myself.

Linking to:
Made by You Monday
Related Posts with Thumbnails